Welcome to the tech blog copacopi

Showing posts with label software. Show all posts

AVG Anti-Virus 2012 free 1 year license key for all users

AVG Anti-Virus 2012 free 1 year license key for UK users

AVG Anti-Virus is to own well-known anti-virus software.To protect the invasion of PC all known threats such as viruses, adware, spyware, worms, backdoors, and so on. AVG Anti-Virus 2012 has advanced proactive identity protection, PC security analysis functionality, the AVG 2012 to add new protection technology, improvements in computer performance and many other improvements, can speed up the scan of your computer, leave the PC high-speed performance scan when using a PC, the low energy scan in the background.
AVG Anti-Virus 2012 Giveaway Details
This Promotion open to UK users in other countries need in order to obtain UK IP Proxy.

If you are not from UK and want to give it a try, you may try to access the offer with a IP based UK proxy service or vpn (clear your browser cookies before doing so), do not try to access the promo page with Web based Proxy, it’s waste of time and you won’t get the success
UK IP address you can view:

You need to have an account to apply for license of AVG Anti-Virus 2012. Just click this link to go to account creation page.
Visit This Giveaway Page to download AVG Anti-Virus 2012 with free 1 year license key.

If you are not logged in, first login. After login, scroll down toward bottom of page where you will see text How To Get Your Serial Code. Click on the blue button Get Serial Code, and your license will be shown and will also be emailed you.
Like us on facebook or follow us on Google+ by visiting these links ,
if you like our work !
Read More

Download Free Norton Antivirus, Internet Security Beta 2013

Symantec has released Norton AntiVirus 2013, Norton Internet Security 2013 and Norton 360 2013 for public beta testing. Norton 2013 betas products will also support Windows 8 Consumer Preview versions and existing platforms.

New Features in Norton Beta 2013 Products:

  • The 2013 products will all have a touchscreen-friendly user interface. “Whatever you did with a mouse, now you can also do with your index finger.
  • The 2013 beta versions will support Windows 8 pre Release versions.
  • The 2013 products will take advantage of Microsoft’s new ELAM (Early Launch Anti-Malware) drivers for protection during the boot process. By using ELAM, the Norton products can control initialization of other drivers and suppress malicious drivers, rootkits, and other tough threats.
  • The new user interface in beta 2013 versions will take advantage of hardware graphics acceleration.
  • Norton software updates, even major ones, will happen without any user interaction and without a reboot.
  • Norton Power Eraser serves to eliminate persistent malware threats that may prevent installation of Norton products

Download beta versions of Norton 360 2013, Norton Internet Security 2013, and Norton AntiVirus 2013 :

Just head over to Norton beta 2013 versions download page and download the Norton 360 2013, Norton Internet Security 2013, and Norton AntiVirus 2013.
Prior to download you have to complete the registration of these free public beta versions download, you will be emailed a 14-day Beta Subscription Activation Key to assist you in testing. Once the Beta Subscription expires, check for the latest builds available. You will then be able to download the new build, and receive a new 14-Day Beta Subscription Activation Key.

Direct Links:


Enjoy Guys! and don't forget to post your comments.
Read More

ROOT your Sony Ericsson Xperia Series Easily


Hello Users,

Here is an easy and simple way to Root your Xperia. XDA Dev’s have created a tool called a FlashTool. This tool right now supports X8, X10, X10 Mini, X10 Mini Pro, Arc, Play, Neo. Rooting is not it’s main purpose. It can be used for installing APK, xRecovery, Flashing, cleaning ROM and many other things.  Still in development, but Rooting through this is very safe and effective. It takes only one click.
So, let’s see how it is done.
REQUIREMENTS:
1. First you will need FlashTool. Download FlashTool from here
Flash tool error fix version. Current version 0.2.9.1 (will be updated as released)
2. JAVA latest. Get it Here. (chose according to your Operating System)
3. Xperia X10 Series phone. (Lol! You have it or you have no purpose to be here)
4. Fixed X10Flashtool.EXE File – Get from same page as above (needed in case if FlashTool gives error about Java JVM Heap Size)
5. Pause/Stop your Antivirus (recent update)
5. Human or equal :-P
UPDATE:
If you have upgraded your Xperia X10a and X10i to new Android 2.3.3 Gingerbread then they won’t be rooted by this method and tools.
INSTALLATIONS:
After downloading FlashTool RAR file, extract it to local folder on your computer. There is a setup file inside it. Run it and give it a location where you want to install the FlashTool. It’s in French so use your mind. Browse button can be identified easily. Then after selecting location just hit Enter. Oui? Lol!
Try to Run file ‘X10FlashTool.exe’ inside the FlashTool folder you just installed. If it returns you with JVM could not be started and xmx Heap size thing. Download the failsafe file given. It’s small. It contains fixed X10FlashTool.exe for people who are having issues. Replace that Old file with this new one, means overwrite.
JAVA. Install it. Not a big deal.
STEPS:
1. On your X10 phone go to Settings >> Application >> Developer >> USB Debugging (Click it. It should be On)
2. If its first time you are connecting your phone to PC then Run driver installation from DRIVERS folder under FlashTool folder. Or you can just install PC Companion or SEUS to get drivers automatically installed.
3. Connect the phone.
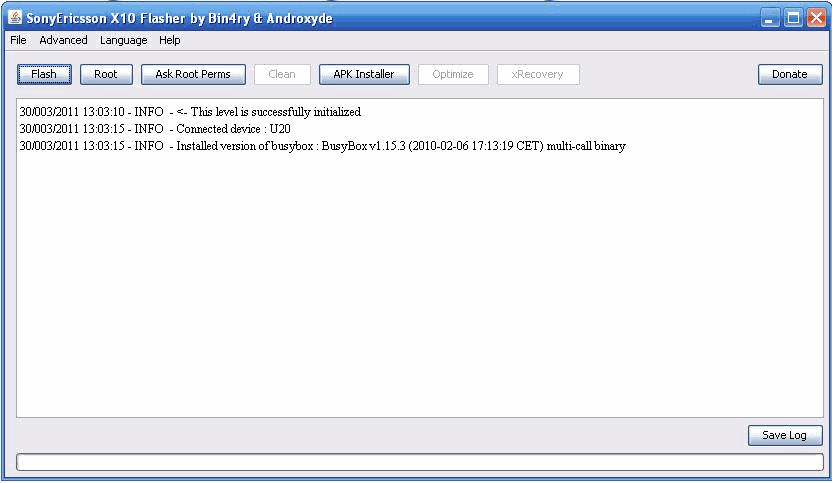
4. Start the FlashTool by clicking X10FlashTool.exe. It will identify the phone. Your screen may look different as my phone is already rooted.

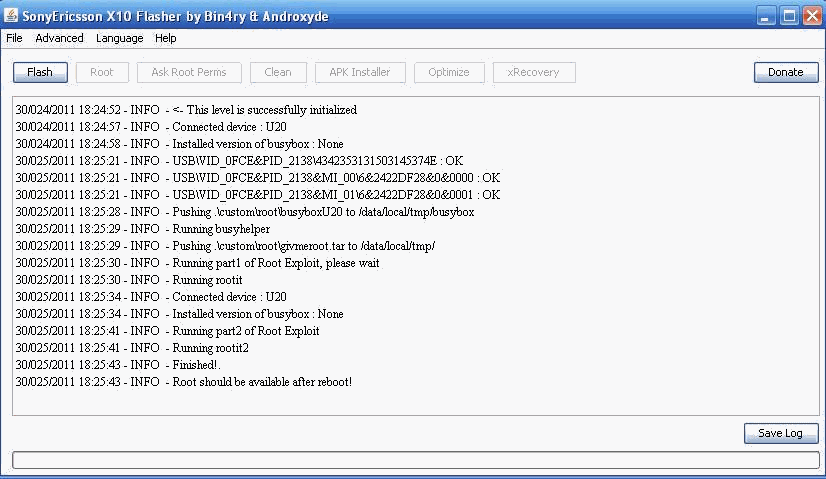
5. Hit Root. Wait for it. It will perform 2 steps and your phone will be restarted. After restart you will SuperUser icon in menu.

You are done! You got your X10 Series phone rooted.
If it by some reason this method doesn’t work for you or you want to explore more. You can read another method in another post. Links are in beginning of this article.
Read More

UC browser 8.3 for AirTel Idea Reliance and other operators.

Hello Users,
 In this edition of Crackohack update, we decided to provide our users something useful and beneficial for their techsawwy life.We are doing our 100% to provide you with latest cool stuffs that you all love and appreciate.
So, here we present most loved,

  UC browser 8.3 version with handler UI 

which is hacked for using free internet ,gprs ,edge and 3g ! on all networks like AIRTEL, RELIANCE ,TATA DOCOMO ,IDEA ,UNINOR,AIRCEL AND VODAFONE.


 Here are some great features of the latest UC browser 8.3 :
1.  Support anyway screen locking and switching
2.  Pop-up ad blocking optimization
3.  Sliding screen optimization-backward smoother
4.  WiFi tips Forum mode, novelsmode switch
5.  Add bookmarks, and other interface UI optimization
6.  Sliding screen performance optimizations over 50%
7.  Supports HTML 5
8.  Advanced HTML Code Supported
9.  JavaScript Advanced
10. High Quality Image Downloading Facility
Read More

Get Android 48 Minutes Free Calling Trick 100% Working

Hello Friends,
In this update on www.crackohack.in , we are bringing a working and cool way to make free calls anywhere in India from your andoid smartphone .
Isn't it cool ?
All you have to do is follow the instructions given below : 
 
Get Free Android 48 Minutes Calling For Any Number In India.

Instructions:-

1] Open Android Market.

2] Search For "Globaltalk" Application.

3] Install Application.

4] Open App And Your Account Will Be Credited For $1

5] Add 0091 Before Number And Make Call.
6] Enjoy free talking for 48  minutes all over India.


You might also like :

#Note:- This Offer Is Only For Android Phone Users.
To Use You Must Have Internet Connection On Your Mobile, Any GPRS Plan Activated.
Read More

Latest Opera Mini 5.1 Android HUI May 2012

Hello users.

We were not posting new stuff since a week, the main reason of this was that we faced a traffic drop on crakohack.in, but we hearlty expect a loyal readership from our readers in the lieu  of great stuff we provide free of cost!
and now everything is going good and we are back with same spirit and latest stuff! 
Just grab them and enjoy !

Before this we have provided many handler apps for java as well as android phones This might be an old one, but still it is our first android HUI. We dont know much about HUI 202 but we stick on to HUI 150.Still HUI 150 and HUI 202 have the same features, they only differ in the looks.So please dont request us for Android HUI and HI 202. It is an android version Opera.

Download it for free from below:


Download from Mediafire 

Also download other handlers like :

New: Android Market Downloader with Handler UI

UC Browser Handler for Android [ UC Browser 8.2.3 Handler ] 

Latest Opera Mini Next 7 Handler UI Mod Java Download [Free Internet Hack]

Read More

Updated 2012: Collection of all Handler mod Applications for Free download

Updated 2012: Collection of all Handler mod Applications  for Free download

Hi, Friends this post for providing you the Handler Mod Downloads for Latest Browser and other useful softwares. Here a biggest ever collection of Handler UI mod for all browsers like UCBrowser (Ucweb), Opera Mini, Opera Mini Mod, Bolt etc and many other useful apps like Nimbuzz, Snaptu, YourTube, Skype, GMap, Gmail, eBuddy, RocketTalk etc. Plz visit regularly for updates. What is Handler UI Mod ?: Handler apps help you to browse for free using network cheats tricks or gain extra speed or better browsing experience, enable you to use custom proxy server and tricks for free internet browsing. It also benefit that your connection works fast, you can choose any server that helps in reducing traffic on servers. Your site opening also improves. And the proxy server provided by service provider cannot be changed directly from phone so thats why we use proxy mod apps. Handler Mod available in different UI like 150, 200, 202, all has different user interface and features.
Note: Some newly Handler UI202 app may ask you activation key/code after 20 times use of app, the default activation key to use handler for unlimited times is www.nextwap.net.

How to Use of Queries In Handler UI Mod Editable Server:


In field Custom HTTP Server : put any customizable proxy server (example: http://wapx.amob.com) with main server of app (example: server4.operamini.com:80/). In this block to use it as proxy http server (example: http://wapx.amob.com.server4.operamini.com/) in any app,
In field Front Query : It mostly used for adding downloading server or downloading trick (exp: wapx.amob.com@) but works only with some service providers,
In fieldMiddle & Back Query : These are mostly useless for us so just leave it blank.
In field Remove String From URL/Remove Port From URL : Leave it blank for default.
In field HOST : You can provide host address or any server here to have a host server.
For example you can try following in Opera Mini 4.2 Handler mod:
1. For fast speed: HTTP Server: http://mini5beta.opera-mini.net:80/ ; Front Query(only if its working for you otherwise leave it blank): wapx.amob.com@ ; Host: http://10.0.0.172/ ; Leave other fields blank.
2. HTTP Server: http://wapx.amob.com.server4.operamini.com:80/ ; Front Query(only if its working for you otherwise leave it blank): wapx.amob.com@ ; Host: http://10.0.0.172/ ; Leave other fields blank.
You can also use this indiatimes server for free browsing: http://wap.indiatimes.com/usearch/, http://mini5beta.opera-mini.net:80/ or add another in place of http://mini5beta.opera-mini.net:80/
Or in UC Browser 8.2 with Airtel:
First initialize UC Browser with all field blanks. Now reopen it and fill in front query:
?m=0.facebook.com/zout=1
Proxy type: real host
Proxy server:
1. live.airtelworld.com
2. m.twitter.com
3. 0.facebook.com
To download mod apps go to below link :

Free Direct Download Links for Latest Handler UI Mod Apps Version:

Read More

How To: Protect and Maintain your PC using Kingsoft PC Doctor

How To: Protect and Maintain your PC using Kingsoft PC Doctor

How To: Protect and Maintain your PC using Kingsoft PC Doctor
Even if your system is fully protected with the latest anti-virus and anti-spyware software, you may notice it slow down over time. Applications take longer to launch and Windows needs more time to boot up and shut down. The reason for this decrease in performance, is that normal Windows usage causes a build up of temporary files, registry entries and other "dead wood" that all results in the operating system not running as efficiently as it could.

Just like a car, all operating systems need a regular tune up to clear these temporary files, diagnose any potential issues and restore things to a more optimal state. This is even more the case with Windows. None of this is any indication of a malicious software infection - it just par for the course. A good system maintenance tool - such as Kingsoft PC Doctor - will do all the hard work for you, leaving you to sit back and watch it cleanse and restore your PC to its former glory.

Step-by-Step Instructions

  • 1
    You can download Kingsoft PC Doctor by clicking the related download link for this article and then choosing Download Now. Once the file setup_multilang.exe has finished downloading, run it to begin the installation process and click the Install option when the Kingsoft PC Doctor install wizard appears.
  • 2
    After installation, Kingsoft PC Doctor launches automatically and its functionality is available via a system tray icon. Kingsoft PC Doctor is designed to be left running constantly (so that it can monitor your system processes for issues) and eats up only a very small amount of system memory. A floating status bar just above the system tray area shows you exactly how much CPU and Memory resource is currently being used, so you can see at a glance if you have any issues in either of these areas. Double click the Kingsoft PC Doctor system tray icon to get started.
  • 3
    Click the Quick Care button to perform a quick sweep of your system for common issues that affect performance. Kingsoft PC Doctor begins checking various cache, history and junk folders to see what can be cleaned out.
  • 4
    Once the scan has been completed, the results are shown in a list. You can click the individual Clean and Optimize buttons in the results list, but it is easier to click the large Fix All button. Kingsoft PC Doctor will now remedy all the problems it detected and reported. You may need to close any running web-browsers to complete this step.
  • 5
    Once this has been done, another set of results are shown - these should be much more green, indicating there are now no system optimisation issues present. You can perform another scan to make sure by clicking Rescan.
  • 6
    Next, click the Cleaner tab to perform some more in-depth spring cleaning. In the Junk Cleaner tab, click the Scan button. There may be some areas that were not cleansed during the Quick Care scan (which is not comprehensive) and these will be picked up here. When the results are displayed, scroll through the list - not all areas are checked by default for cleaning - and tick the relevant boxes for any folders you want to clear out.
  • 7
    Click the Clean button to proceed and Kingsoft PC Doctor will now empty all the selected folders in the list.
  • 8
    Another area which is often commonly associated with slow performance is the registry. This is a database that stores all the configuration settings, file extensions and other details for all the programs you have installed. When you uninstall an application, it usually leaves behind many traces in the registry, and these build up over time, often causing a drop in performance. You can spring clean the registry by clicking the Registry Cleaner tab and then Scan. Kingsoft PC Doctor analyses the current status of your registry and looks for invalid entries that are no longer needed.
  • 9
    Click Clean Now when the results are displayed and Kingsoft PC Doctor will optimise your registry. You should now find that your system performs a great deal better than it did before.

Tips & Advice

  • It is recommended to update Kingsoft PC Doctor regularly, as improvements are constantly being made to make the application more efficient. When viewing the main interface, click the Update button to check for any new releases. If any are found, Kingsoft PC Doctor will download and install them automatically.
Read More

KGB Archiver: Compress 1GB File to 10MB

KGB Archiver: Compress 1GB File to 10MB

KGB Archiver is free and open source software which compresses 1GB file to 10MB file.
Data compression utility of this software is based on PAQ6 algorithm which has AES-256 powerful encryption. KGB archiver works on both Windows and Linux operating system. Compression ratio of this software is very high. Due to high compression levels, time to compress a file goes high as the size of the file increases and compression ratio may vary depending on the format of the file.
When a file is compressed with KGB Archiver it saves it with own extension and at the time of decompression it automatically recognizes the file format. The only limitation of KGB archiver is, decompressed file cannot be open or extract with other compression softwares. You can also choose any compression level (high, maximum, normal, low, very weak) to compress a file but the compression time  will vary according to your selected compression level.
Note: If you are compressing any file with KGB archiver and sending the comprssed file to your friends then he must have KBG archiver installed on his computer to decompress the file.

System Requirements:

Due to high compression ratio of KGB archiver, you need to have a decent system hardware configuration
  • 256 MB RAM
  • 1.5 GHz Processor

Features of KGB Archiver

  • Supports native .kgb files and .zip files
  • AES-256 Encryption
  • Able to create self-extracting archives.
  • Multilanguage supports like Arabic, German, Greek, Japanese, Spanish many more.
  • Unicode is supported in both User Interface and File Systems.
  • An Explorer shell extension is available for the windows version.
  • Make Password protected compressed file.
 

Note: This KBG Archiver software cannot compress video format files.
Read More

DOWNLOAD MOBILE VIRUS sis sisx FOR SYMBIAN PHONES

 Today we are bringing a  virus tool for nokia symbian users.It would be of great use to you all!


DOWNLOAD MOBILE VIRUS FOR SYMBIAN PHONE VIRUS SUPPORTED FOR SIS SISX MOBILE PHONES INFECT YOUR FRIENDS MOBILE PHONE USING THIS VIRUS

USAGE NOTE: OPEN ON THE APPLICATION ON YOUR FRIENDS MOBILE HACKING OR INFECTING DONE

DOWNLOAD LINK SYMBIAN sis sisx :

Read More

Crackohack Special virus Maker 1.1 free download


Crackohack Special virus Maker 1.1
 DeadLine's Virus Maker 1.1


Hi all users, This is a cool virus maker we're posting here, and brought  to  you exclusively  by us.
You can also check another tutorial on :How to create a Computer Virus?
And 
This is what our authrors say about it.

We decided to make a custom virus maker because I don’t trust all the other virus makers that are out there on the net. I think it took me about 4 hours to code this. If you are wondering why it took me that long: it is because I used a new theme and new components, and I’m still learning how to use them properly.

Video:


Download:
Virustotal:
Read More

Adobe Master Collection CS5 Serial Numbers For Windows - Latest Serial Key 2012

Hello To All crackohack.inreaders . today i am Gathered Few Serials Numbers Which Help Help to Make Products Full version And Boost Your Performance . So Now Today i am give you full tutorial on how can you use these serials numbers .So First You Need To Some Follow Steps For Do This .


1. First You Need To Install Your Product As A Free Trial Version .

2. So After Install Your Product Don't Run It . Just Close it

3. NOW Go To Start And Search For Notepad And Run it as An Administrator

4. In Next step NaVigate To Computer > Local Disk (C:) > Windows > System32 > Drivers > Etc. > Hosts

5. And Now Add Given Below Text the end of hosts file

127.0.0.1                activate.adobe.com
127.0.0.1                practivate.adobe.com
127.0.0.1                ereg.adobe.com
127.0.0.1                activate.wip3.adobe.com
127.0.0.1                wip3.adobe.com
127.0.0.1                3dns-3.adobe.com
127.0.0.1                3dns-2.adobe.com
127.0.0.1                adobe-dns.adobe.com
127.0.0.1                adobe-dns-2.adobe.com
127.0.0.1                adobe-dns-3.adobe.com
127.0.0.1                ereg.wip3.adobe.com
127.0.0.1                activate-sea.adobe.com
127.0.0.1                wwis-dubc1-vip60.adobe.com
127.0.0.1                activate-sjc0.adobe.com
127.0.0.1                               adobe.activate.com
127.0.0.1                               adobeereg.com                       
127.0.0.1                               www.adobeereg.com                   
127.0.0.1                               wwis-dubc1-vip60.adobe.com          
127.0.0.1                               125.252.224.90                      
127.0.0.1                               125.252.224.91
127.0.0.1                               hl2rcv.adobe.com

6. Now Just See Below Image


7. And So now You have completed the all main step which help you In Getting Your Serial Numbers Accepted.

8. In Last Step  Just Disconnect Your Internet Connection And Fire Up Your Software And Then Put Below Given Serials Numbers According To Your Systems .


my friends these are serial keys :-)
enjoy :-)
Read More

TuneUp Utilities 2012 Full $49.95


TuneUp Utilities 2012 is a software to optimize the performance of laptop computers atapun. TuneUp Utilities 2012 using the Windows operating system will be faster, convenient and more secure with just a few clicks. In addition to the operating system can speed up performance, TuneUp Utilitiesterbaru can also be used to customize the look of your Windows system. Features TuneUp 1 - Click on the maintenance of a mainstay of the program are available and becoming one of excellence The TuneUp Utilities 2012.


The software helps both beginners and experts to make Windows meet their needs in a way that better, easier and safer. TuneUp Utilities will then make the necessary changes in the registry or boot files automatically. We place a high value on system stability, so that Windows will not stop working.


With TuneUp Utilities 2012 will quickly make your Windows system faster and more convenient to use, and ensure that it works in the long panjang.TuneUp Utilities 2012 makes the perfect program for everyone for those who prefer to leave the computer maintenance for and reliable partner for those who prefer to do it all yourself.


Maintain System           

Defragment registry
1-Click Maintenance and Automatic Maintenance
Optimize system startup and shutdown
 Defragment hard disks
 Remove broken shortcuts
 Clean registry
 
Increase performance  

Turbo Mode
Configure Live Optimization
Free up disk space
Configure system startup
Display and uninstall programs
Fix problems 

Fix typical problems
Restore deleted data
Check hard drive for errors
Manage running programs
Serials:  
- M8076E-27T3AN-F2MVXJ-D9FF52-63VE2X-5W8772
- W6DB76-EHNH3K-K4E5AN-5JMNR3-3254MK-52BWYR
- RX5NFQ-2A11PM-C1B7F4-K6KA0N-7P3BQ4-WRYD8E
- 5A42PP-V0Q605-2YJHMX-CJKW9J-4WQKKQ-E8RVNX
- 2JEDV1-8QYXN0-Y9AJ5W-DBC9E3-YCBNAJ-KVAPT6
- EB7D56-F97B09-BTR462-WBBRJ0-J2P8J3-R0E4V5
- KHHWJ9-PWA18K-N3KJBK-NK99MB-W1KWJ9-XP6T2Y
- Q5P577-T8VEKA-0DNF16-K2R9V4-T7QQF0-VFB4QR
- KX9TR3-5JN919-R63M2Q-RT8NWQ-DQDYB2-K90C7W
- 189C7Q-BY7E0N-6APQQT-40WBV6-6T9D35-3KB7Q7
- D3N9JJ-6ER88C-JNJD96-8FHB4P-P5WPEP-2BJEN9
- MKTE25-A556EC-51N44T-45A205-PRC1NM-YJ5D83
- EB7D56-F97B09-BTR462-WBBRJ0-J2P8J3-R0E4V5
- KTVR9R-1DAR7K-056V8D-TYM5VT-W4MMXE-03RYDH
- 40RX3P-4YD61E-DXEHEY-TFV6NN-JWFQ4C-KMB1XQ 

Download here


Enjoy smoother pc .......
Read More

How to: Video streaming between PC and Android


Today’s smartphones, particularly those based on the Android platform, are media powerhouses, so it’s very likely that you have tons of photos and video clips you’d like to share with friends and family. But it can get pretty painful showing them off on your handset’s tiny screen. Wouldn’t it be nice if you could watch it on your laptop, desktop monitor or your large screen TV without having to transfer the files onto your PC? Getting a USB cable and hooking up your phone to your PC is tedious and time consuming. And what if you happen to be at a friend’s place and don’t have your USB cable with you? Moreover, you wouldn’t want to transfer your personal media onto someone else’s PC. In this workshop, we will show you how you can stream video, photos or music from your mobile phone directly on to a desktop PC or laptop. All you need is a simple free Android app called VLC Direct, a media playback application called VLC Media Player on your PC, and the two connected to the same network. Download VLC Direct for free from the Android Market. Download and install VLC on your PC from ‘www.videolan.org’. Connect the PC and the Android phone to a wireless router and you are ready to stream. Step 1: Start VLC Direct on your Android handheld. A small wizard will guide you through the process of configuring the video streaming necessities. Be careful because if youaccidentally quit the application or press the back button on your phone, VLC Direct will exit and not show you the wizard again. In this case, you can press the Menu button, go to ‘Settings’, and select the ‘Automatic Connection Wizard’ to re-initiate the wizard.

Step 2: Start your PC, connect it to a large screen LCD TV if you want to enjoy videos on a big screen. Start VLC Media Player on your PC. Click on ‘View | Add Interface | Web interface’ and leave VLC Media player as it is. Step 3: On the mobile phone screen, select the ‘Start’ button and the VLC Direct app will start scanning for the machine with VLC Media Player on your local network. Once that is done, you receive a toast message stating that it has found the player and the configurations have been set. You are now ready to stream your
 media files onto your PC instantly. Using the Android handset, you can sit back and
scroll through your list of videos, photos, or music files and watch play them back on the big screen. You can control the playback (stop, play, pause, forward or rewind) and volume controls too. What’s more, you can also pull up the list of media files stored on the PC (running the VLC Media Player) and play those. The VLC Direct interface includes playback control buttons, icons for videos and music on your phone,  monitor icon for listing files available on the remote PC and a VLC icon for a playlist. Towards the top-left of the screen, you will find an Android logo icon
(target), which is a toggle button that can be used to direct the video stream to your PC from your handheld or from the PC to the handheld. The screenshots here will explain these
buttons in detail. Streaming media from the PC to the Android phone is pretty
simple using the target button. Using this mode is beneficial as you don’t need to transcode or
convert your videos into a compatible format for your Android device.You can also save on
storage space on your phone by treating the PC as a media server. Streaming
from your PC to the Android device can also be convenient when someone elseis using the laptop and you’d like to access media content on it.
Note: In order to stream media files from a PC to your Android phone, youwill need to purchase the VLC Direct Pro version, which is available on the Android Market for Rs 164. The Free
version can stream seamlessly to a PC without any limit, but streaming from a PC to your phone is only allowed for a few minutes.
Read More

Kaspersky KAV KIS and Pure Keys 13 Feb 2012

Kaspersky KAV KIS and Pure Keys 13 Feb 2012

  1. Open Kaspersky 2011 License Manager (from lower right corner).
  2. Click Activate the application with a new license button. (Delete any trial key first,by clicking the red X next  to the key).
  3. Select Activate commercial version and enter the activation license code as 11111-11111-11111-1111X
  4. Wait activation wizard message->Click OK
  5. Wait for wrong activation code message->Click OK->Screen will appear with KEY FILE BROWSE 
  6. Browse to the key location and activate kaspersky.
Support for
Kaspersky Internet Security 2012
Kaspersky Internet Security 2011
Kaspersky Internet Security 2010
Kaspersky Antivirus 2012 
Kaspersky Antivirus 2011
Kaspersky Antivirus 2010
Kaspersky Pure

via Jumbofiles
Read More

Advanced SystemCare Pro v5.2.0.222 Final Inc. Serial


||Advanced SystemCare Pro v5.2||

[Serial Key | Mediafire]


Advanced SystemCare PRO Edition The World’s Top System Utility for Superior PC Health. Advanced SystemCare PRO (formerly Advanced WinodwsCare Professional) provides an always-on, automated, all-in-one PC Healthcare Service with anti-spyware, privacy protection, performance tune-ups, and system cleaning capabilities. This powerful and award-winning precision tool fixes stubborn errors, cleans out clutter, optimizes internet and download speeds, ensures personal security and maintains maximum computer performance automatically.

                   DOWNLOAD    LINKS                         ||Single Resumable Download Links Size: 31MB||
Mediafire | Uploadorb | Uploadbaz | Filekeen

Read More

© Copacopi, AllRightsReserved.