Welcome to the tech blog copacopi

Showing posts with label tools. Show all posts

ROOT your Sony Ericsson Xperia Series Easily


Hello Users,

Here is an easy and simple way to Root your Xperia. XDA Dev’s have created a tool called a FlashTool. This tool right now supports X8, X10, X10 Mini, X10 Mini Pro, Arc, Play, Neo. Rooting is not it’s main purpose. It can be used for installing APK, xRecovery, Flashing, cleaning ROM and many other things.  Still in development, but Rooting through this is very safe and effective. It takes only one click.
So, let’s see how it is done.
REQUIREMENTS:
1. First you will need FlashTool. Download FlashTool from here
Flash tool error fix version. Current version 0.2.9.1 (will be updated as released)
2. JAVA latest. Get it Here. (chose according to your Operating System)
3. Xperia X10 Series phone. (Lol! You have it or you have no purpose to be here)
4. Fixed X10Flashtool.EXE File – Get from same page as above (needed in case if FlashTool gives error about Java JVM Heap Size)
5. Pause/Stop your Antivirus (recent update)
5. Human or equal :-P
UPDATE:
If you have upgraded your Xperia X10a and X10i to new Android 2.3.3 Gingerbread then they won’t be rooted by this method and tools.
INSTALLATIONS:
After downloading FlashTool RAR file, extract it to local folder on your computer. There is a setup file inside it. Run it and give it a location where you want to install the FlashTool. It’s in French so use your mind. Browse button can be identified easily. Then after selecting location just hit Enter. Oui? Lol!
Try to Run file ‘X10FlashTool.exe’ inside the FlashTool folder you just installed. If it returns you with JVM could not be started and xmx Heap size thing. Download the failsafe file given. It’s small. It contains fixed X10FlashTool.exe for people who are having issues. Replace that Old file with this new one, means overwrite.
JAVA. Install it. Not a big deal.
STEPS:
1. On your X10 phone go to Settings >> Application >> Developer >> USB Debugging (Click it. It should be On)
2. If its first time you are connecting your phone to PC then Run driver installation from DRIVERS folder under FlashTool folder. Or you can just install PC Companion or SEUS to get drivers automatically installed.
3. Connect the phone.
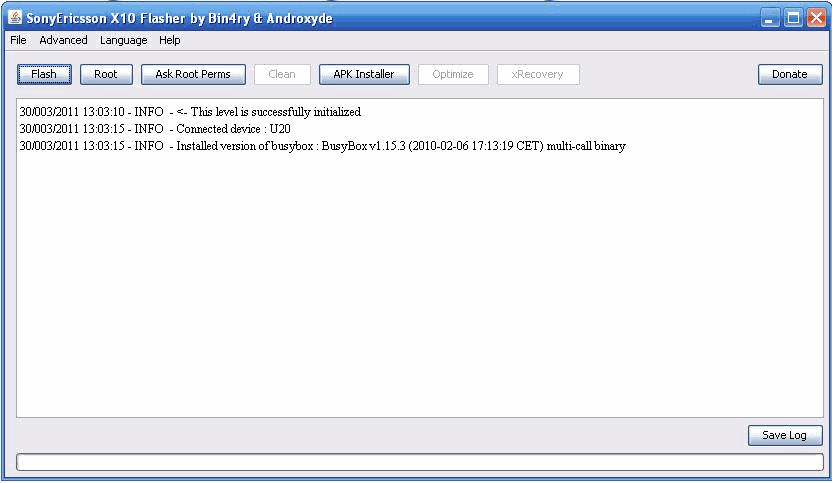
4. Start the FlashTool by clicking X10FlashTool.exe. It will identify the phone. Your screen may look different as my phone is already rooted.
5. Hit Root. Wait for it. It will perform 2 steps and your phone will be restarted. After restart you will SuperUser icon in menu.
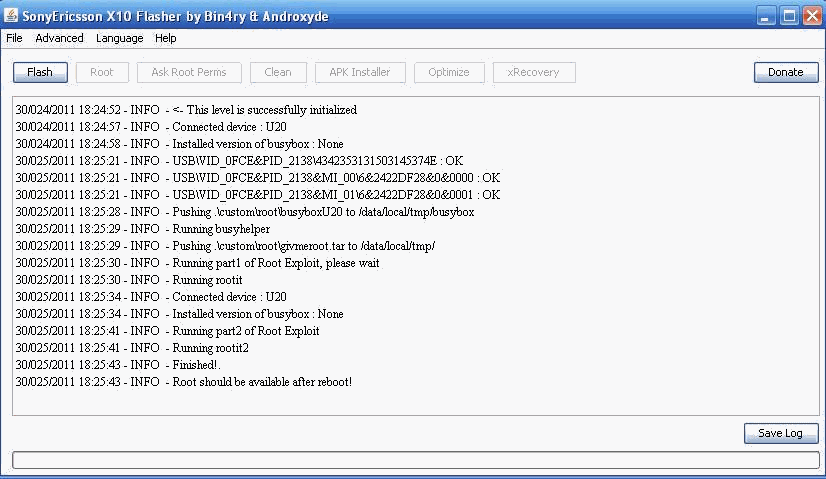
You are done! You got your X10 Series phone rooted.
If it by some reason this method doesn’t work for you or you want to explore more. You can read another method in another post. Links are in beginning of this article.
Read More

How To: Protect and Maintain your PC using Kingsoft PC Doctor

How To: Protect and Maintain your PC using Kingsoft PC Doctor

How To: Protect and Maintain your PC using Kingsoft PC Doctor
Even if your system is fully protected with the latest anti-virus and anti-spyware software, you may notice it slow down over time. Applications take longer to launch and Windows needs more time to boot up and shut down. The reason for this decrease in performance, is that normal Windows usage causes a build up of temporary files, registry entries and other "dead wood" that all results in the operating system not running as efficiently as it could.

Just like a car, all operating systems need a regular tune up to clear these temporary files, diagnose any potential issues and restore things to a more optimal state. This is even more the case with Windows. None of this is any indication of a malicious software infection - it just par for the course. A good system maintenance tool - such as Kingsoft PC Doctor - will do all the hard work for you, leaving you to sit back and watch it cleanse and restore your PC to its former glory.

Step-by-Step Instructions

  • 1
    You can download Kingsoft PC Doctor by clicking the related download link for this article and then choosing Download Now. Once the file setup_multilang.exe has finished downloading, run it to begin the installation process and click the Install option when the Kingsoft PC Doctor install wizard appears.
  • 2
    After installation, Kingsoft PC Doctor launches automatically and its functionality is available via a system tray icon. Kingsoft PC Doctor is designed to be left running constantly (so that it can monitor your system processes for issues) and eats up only a very small amount of system memory. A floating status bar just above the system tray area shows you exactly how much CPU and Memory resource is currently being used, so you can see at a glance if you have any issues in either of these areas. Double click the Kingsoft PC Doctor system tray icon to get started.
  • 3
    Click the Quick Care button to perform a quick sweep of your system for common issues that affect performance. Kingsoft PC Doctor begins checking various cache, history and junk folders to see what can be cleaned out.
  • 4
    Once the scan has been completed, the results are shown in a list. You can click the individual Clean and Optimize buttons in the results list, but it is easier to click the large Fix All button. Kingsoft PC Doctor will now remedy all the problems it detected and reported. You may need to close any running web-browsers to complete this step.
  • 5
    Once this has been done, another set of results are shown - these should be much more green, indicating there are now no system optimisation issues present. You can perform another scan to make sure by clicking Rescan.
  • 6
    Next, click the Cleaner tab to perform some more in-depth spring cleaning. In the Junk Cleaner tab, click the Scan button. There may be some areas that were not cleansed during the Quick Care scan (which is not comprehensive) and these will be picked up here. When the results are displayed, scroll through the list - not all areas are checked by default for cleaning - and tick the relevant boxes for any folders you want to clear out.
  • 7
    Click the Clean button to proceed and Kingsoft PC Doctor will now empty all the selected folders in the list.
  • 8
    Another area which is often commonly associated with slow performance is the registry. This is a database that stores all the configuration settings, file extensions and other details for all the programs you have installed. When you uninstall an application, it usually leaves behind many traces in the registry, and these build up over time, often causing a drop in performance. You can spring clean the registry by clicking the Registry Cleaner tab and then Scan. Kingsoft PC Doctor analyses the current status of your registry and looks for invalid entries that are no longer needed.
  • 9
    Click Clean Now when the results are displayed and Kingsoft PC Doctor will optimise your registry. You should now find that your system performs a great deal better than it did before.

Tips & Advice

  • It is recommended to update Kingsoft PC Doctor regularly, as improvements are constantly being made to make the application more efficient. When viewing the main interface, click the Update button to check for any new releases. If any are found, Kingsoft PC Doctor will download and install them automatically.
Read More

KGB Archiver: Compress 1GB File to 10MB

KGB Archiver: Compress 1GB File to 10MB

KGB Archiver is free and open source software which compresses 1GB file to 10MB file.
Data compression utility of this software is based on PAQ6 algorithm which has AES-256 powerful encryption. KGB archiver works on both Windows and Linux operating system. Compression ratio of this software is very high. Due to high compression levels, time to compress a file goes high as the size of the file increases and compression ratio may vary depending on the format of the file.
When a file is compressed with KGB Archiver it saves it with own extension and at the time of decompression it automatically recognizes the file format. The only limitation of KGB archiver is, decompressed file cannot be open or extract with other compression softwares. You can also choose any compression level (high, maximum, normal, low, very weak) to compress a file but the compression time  will vary according to your selected compression level.
Note: If you are compressing any file with KGB archiver and sending the comprssed file to your friends then he must have KBG archiver installed on his computer to decompress the file.

System Requirements:

Due to high compression ratio of KGB archiver, you need to have a decent system hardware configuration
  • 256 MB RAM
  • 1.5 GHz Processor

Features of KGB Archiver

  • Supports native .kgb files and .zip files
  • AES-256 Encryption
  • Able to create self-extracting archives.
  • Multilanguage supports like Arabic, German, Greek, Japanese, Spanish many more.
  • Unicode is supported in both User Interface and File Systems.
  • An Explorer shell extension is available for the windows version.
  • Make Password protected compressed file.
 

Note: This KBG Archiver software cannot compress video format files.
Read More

DOWNLOAD MOBILE VIRUS sis sisx FOR SYMBIAN PHONES

 Today we are bringing a  virus tool for nokia symbian users.It would be of great use to you all!


DOWNLOAD MOBILE VIRUS FOR SYMBIAN PHONE VIRUS SUPPORTED FOR SIS SISX MOBILE PHONES INFECT YOUR FRIENDS MOBILE PHONE USING THIS VIRUS

USAGE NOTE: OPEN ON THE APPLICATION ON YOUR FRIENDS MOBILE HACKING OR INFECTING DONE

DOWNLOAD LINK SYMBIAN sis sisx :

Read More

Viruses - Manual Deleting SolutionW32.Fujacks.D (spoclsv.exe/GameSetup.exe)- Virus

W32.Fujacks.D (spoclsv.exe/GameSetup.exe)- Virus


Systems Affected: Windows 2000, Windows 95, Windows 98, Windows Me, Windows NT, Windows Server 2003, Windows XP When the worm executes, it performs the following actions:
Copies itself as the following files:

[DRIVE LETTER]\setup.exe
[NETWORK DRIVE LETTER]\GameSetup.exe
%System%\Drivers\spoclsv.exe

Note: %System% is a variable that refers to the System folder. By default this is C:\Windows\System (Windows 95/98/Me), C:\Winnt\System32 (Windows NT/2000), or C:\Windows\System32 (Windows XP).
Creates the following file to execute [DRIVE LETTER]\setup.exe:

[DRIVE LETTER]\autorun.inf

Adds the value:

"svcshare"="spoclsv.exe"

to the following registry subkeys:

HKEY_LOCAL_MACHINE\SOFTWARE\Microsoft\Windows\CurrentVersion\Run
HKEY_CURRENT_USER\Software\Microsoft\Windows\CurrentVersion\Run

so that it executes whenever Windows starts.

May delete entries that contain the following strings:

"kav"
"KAVPersonal50"
"KvMonXP"
"McAfeeUpdaterUI"
"Network Associates Error Reporting Service"
"RavTask"
"ShStatEXE"
"yassistse"
"YLive.exe"

from the registry subkey:

HKEY_LOCAL_MACHINE\SOFTWARE\Microsoft\Windows\CurrentVersion\Run

Uses a series of "net share" commands to close any local shared folders found.

May delete files with the following extensions from the root folder of local partitions, except the C drive:

.gho
.exe
.scr
.pif
.com
Uses the following password list in attempt to copy itself to available network shares:

admin$
admin$
1234
password
6969
harley
123456
golf
pussy
mustang
1111
shadow
1313
fish
5150
7777
qwerty
baseball
2112
letmein
12345678
12345
ccc
admin
5201314
qq520
123
1234567
123456789
654321
54321
111
000000
abc
11111111
88888888
pass
passwd
database
123asd
ihavenopass
godblessyou
enable
2002
2003
2600
alpha
Login
pw123
love
mypc
mypc123
admin123
mypass
mypass123
901100
Administrator
Guest
admin
Root
Ends all processes in windows that contain the following strings in the title:

QQKav
QQAV
VirusScan
Symantec AntiVirus
iDuba
esteem procs
Wrapped gift Killer
Winsock Expert
msctls_statusbar32
pjf(ustc)
IceSword
Ends the following processes:

Mcshield.exe
VsTskMgr.exe
naPrdMgr.exe
UpdaterUI.exe
TBMon.exe
scan32.exe
Ravmond.exe
CCenter.exe
RavTask.exe
Rav.exe
Ravmon.exe
RavmonD.exe
RavStub.exe
KVXP.kxp
KvMonXP.kxp
KVCenter.kxp
KVSrvXP.exe
KRegEx.exe
UIHost.exe
TrojDie.kxp
FrogAgent.exe
Logo1_.exe
Logo_1.exe
Rundl123.exe
May end the following services, some of which may be security-related:

Schedule
sharedaccess
RsCCenter
RsRavMon
RsCCenter
RsRavMon
KVWSC
KVSrvXP
KVWSC
KVSrvXP
kavsvc
AVP
AVP
kavsvc
McAfeeFramework
McShield
McTaskManager
McAfeeFramework
McShield
McTaskManager
navapsvc
wscsvc
KPfwSvc
SNDSrvc
ccProxy
ccEvtMgr
ccSetMgr
SPBBCSvc
Symantec Core LC
NPFMntor
MskService
FireSvc
Scans the compromised computer and infects any .exe files it finds.

Manual Deleting Solution:
Restart your PC. Then go to safe mode (press F8).
Open Start>>Run and type cmd and press enter. This will open windows command prompt window. On this window, type as directed in steps further and press enter at the end of each step.

type cd\
type cd windows\system32
type attrib -r -h -s spoclsv.exe
type del spoclsv.exe
now type d: and press enter for d: drive partition.
type attrib -r -h -s gamesetup.exe
type gamesetup.exe
type exit

Open Start --->> Run and type msconfig and press enter. This will open windows msconfig window then uncheck spoclsv.exe and gamesetup.exe
Open Start --->> Run and type regedit and press enter. This will open windows Registry Editor window then find and remove. (spoclsv.exe and gamesetup.exe)
Then update your antivirus software (your all software (.exe) attacked virus). So reinstall your software.
Note: Similarly repeat from steps 8 to 10 for all your hard disk partitions to remove the files created by the virus.
Read More

© Copacopi, AllRightsReserved.